1. SystemC Setup
从www.systemc.org下载最新的SystemC library,这里我们统一使用已经stable的2.1.v1版。在library下载到本地以后,需要进行一次性的安装流程。这个安装流程是利用用户所使用的编译环境编译用户所需的基本SystemC library的过程。
对于Linux和Windows的安装流程是不一样的,下面分别详述。
1.1. For Linux
1、 解压缩包
a) gunzip systemc-2.1.v1.tgz
b) tar –xvf systemc-2.1.v1.tar
2、 安装library
a) 进入安装目录
cd systemc-2.1.v1
b) 创建临时文件夹
mkdir temp
cd temp
c) 设置环境
setenv CXX g++
d) 配置包
../configure
e) 编译包
gmake
f) 安装包
gmake install
g) 删除临时文件夹
rm –rf temp
经过以上的步骤,SystemC就安装完成了。
1.2. For Windows
要在Windows环境下使用SystemC,需要标准的C++编译器。在这里,我们统一使用VC++6.0。以下的操作都本地已经安装了VC++6.0。
1、 进入SystemC安装目录下的msvc60SystemC子目录,如:
C:systemc-2.1.v1msvc60SystemC
2、 双击SystemC.dsw,VC++6.0会自动运行
3、 点击 或按ctrl+F5,开始编译SytemC.lib。编译过程的最后会询问exe文件的名字,选择Cancel。
经过以上的步骤,在systemc-2.1.v1msvc60SystemCDebug目录下,会生成SytemC.lib这个文件。安装完成。
2. SystemC Design Example
2.1. Module Design
本文以AMBA协议中AHB上的Reset Controller的设计为例子,具体说明SystemC的设计流程。
2.1.1. Introduction to Reset Controller
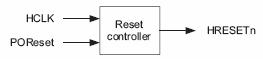
当外部复位指示POReset信号到来时,Reset controller产生系统的复位信号。其结构如下图:
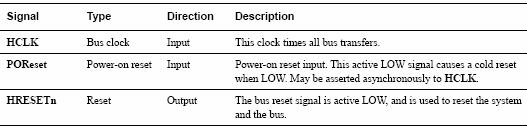
2.1.2. Signal Descriptions
2.1.3. Function and operations
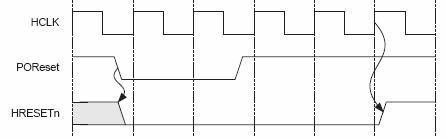
POReset是个异步复位的指示信号。HRESETn对POReset打了三拍以消除亚稳态。以下是时序示意图:
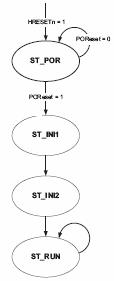
在这里,我们用一个状态机来完成打三拍的操作,状态机状态转换示意图如下:
下图是Reset Controller的电路示意图:

2.1.4. SystemC Source Code
/******************************************************
Filename : rst_ctrl.h
Auther : Richeal.Li
Date : 2006-09-08
******************************************************/
#include "systemc.h"
SC_MODULE(rst_ctrl){
sc_in
sc_in
sc_out
enum state_type{ ST_POR = 0x1, ST_INI1 = 0x2, ST_INI2 = 0x3, ST_RUN = 0x4};
sc_signal
void prc_rst_ctrl() ;
SC_CTOR(rst_ctrl){
SC_METHOD(prc_rst_ctrl) ;
sensitive_pos << HCLK ;
sensitive_neg << POReset;
}
};
/******************************************************
Filename : rst_ctrl.cpp
Auther : Richeal.Li
Date : 2006-09-08
******************************************************/
#include "rst_ctrl.h"
void rst_ctrl::prc_rst_ctrl(){
if(!POReset.read()){
rst_state = ST_POR;
HRESETn = 0 ;
}
else
switch(rst_state){
case ST_POR :
HRESETn = 0 ;
rst_state = ST_INI1 ;
break;
case ST_INI1:
HRESETn = 0 ;
rst_state = ST_INI2 ;
break;
case ST_INI2:
HRESETn = 0 ;
rst_state = ST_RUN ;
break;
case ST_RUN :
HRESETn = 1 ;
rst_state = ST_RUN ;
break;
default:
HRESETn = 1 ;
rst_state = ST_RUN ;
break;
}
}
2.2. Testbench Design
为了验证设计的正确性,我们还需要编写Testbench。因为设计非常简单,这里的Testbench只做以下两件事情:
1、 产生激励;
2、 保存波形
2.2.1. Generate POReset
/******************************************************
Filename : gen_poreset.h
Auther : Richeal.Li
Date : 2006-09-08
******************************************************/
#include "systemc.h"
SC_MODULE(gen_poreset){
sc_out
void prc_gen_poreset() ;
SC_CTOR(gen_poreset){
SC_THREAD(prc_gen_poreset);
}
};
/******************************************************
Filename : gen_poreset.cpp
Auther : Richeal.Li
Date : 2006-09-08
******************************************************/
#include "gen_poreset.h"
void gen_poreset::prc_gen_poreset(){
//1st POReset
POReset.write(1);
wait(45, SC_NS) ;
POReset.write(0);
wait(60, SC_NS) ;
POReset.write(1);
wait(100, SC_NS);
//2nd POReset
POReset.write(1);
wait(45, SC_NS) ;
POReset.write(0);
wait(60, SC_NS) ;
POReset.write(1);
}
2.2.2. Generate Clock and Dump Wave
以下给出了testbench的顶层代码,要注意的是:时钟的产生必须在main顶层,不能放在子模块中产生。
/******************************************************
Filename : main.cpp
Auther : Richeal.Li
Date : 2006-09-08
Description : The testbench of rst_ctrl
******************************************************/
#include "rst_ctrl.h"
#include "gen_poreset.h"
int sc_main(int argc, char * argv[]){
sc_signal
sc_signal
sc_trace_file * tf; //建立文件指针
sc_clock clk("clk", 20, SC_NS); //产生时钟
gen_poreset u_gen_poreset("gen_poreset");
u_gen_poreset.POReset(prst) ;
rst_ctrl u_rst_ctrl("u_rst_ctrl");
u_rst_ctrl.HCLK(clk) ;
u_rst_ctrl.POReset(prst) ;
u_rst_ctrl.HRESETn(rst_n) ;
tf = sc_create_vcd_trace_file("dump"); //dump波形,波形为VCD格式
sc_trace(tf, clk, "HCLK") ;
sc_trace(tf, prst, "POReset") ;
sc_trace(tf, rst_n, "HRESETn") ;
sc_start(500, SC_NS); //设置运行时间
sc_close_vcd_trace_file(tf);
cout << "Finished at time " << sc_time_stamp() << endl;
return 0;
}
-
 热敏电阻温度阻值查询程序2024年11月13日 74
 -
C99语法规则2024年11月16日 675
-
 FreeRTOS 动态内存管理2024年11月12日 448
 -
一款常用buffer程序2024年11月06日 88
-
 1602液晶显示模块的应用2012年08月03日 192
 -
GNU C 9条扩展语法2024年11月18日 261
-
 如何实现STM32F407单片机的ADC转换2024年11月15日 300
 -
 STM32使用中断屏蔽寄存器BASEPRI保护临界段2024年11月15日 195
-
C99语法规则2024年11月16日 675
-
 51单片机LED16*16点阵滚动显示2012年09月05日 664
 -
FreeRTOS 动态内存管理2024年11月12日 448
-
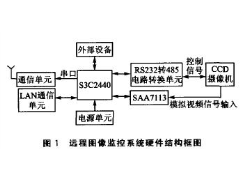 ARM9远程图像无线监控系统2012年07月03日 424
 -
 用单片机模拟2272软件解码2012年09月06日 300
 -
如何实现STM32F407单片机的ADC转换2024年11月15日 300
-
 新颖的单片机LED钟2012年08月06日 278
 -
GNU C 9条扩展语法2024年11月18日 261