这个是在uclinux下为4510B添加自己程序,并编译/下载它们的过程
step 1:
创建一个自己的Application: 请首先认真阅读uClinux 2.4.x Kernel的目录内的Document,directry:
../Documentation/Adding-User-Apps-HOWTO.txt
通过阅读this document可以帮助您自己动手创建一个application.
step 2:
创建一个自己的application工程后,您可以利用Linux(Redhat等)在PC上编译,在PC上通过执行(./youappexe)来验证您的程序是否有bug or error等.但是这个在PC上看起来可以run的"可执行程序/文件"不是您的基于ARM/DragonBall/ColdFire/PowerPC等单片机环境的"可执行程序/文件",因为PC(x86)平台使用的文件系统和您的目标板子(单片机板子)的uClinux使用的文件系统不相同, uClinux的ROMFS格式的可执行程序/文件是不能被PC上的Linux(Redhat等)所认识的.假设您创建的new application:
../user/MyApp/demo.c
假设您已经完全按照下面的要求(*在../Documentation/Adding-User-Apps-HOWTO.txt中也是这样要求的 *):
../user/MyApp/demo.c的内容 -----
#include
#include
void main(void)
{
printf("Hello world! This is my first app. from WangZF,2002/11/04\n");
}
../user/MyApp/Makefile的内容和格式 -----

然后编译它,仅在当前的应用程序目录执行:make,结果自己看吧,正如您的预料。
step 3:
增加下面的内容到../user/Makefile中:
dir_$(CONFIG_USER_MYAPP_DEMO) += myapp
它的作用是让编译器可以访问到您创建的MyApp目录的Makefile. 它被加到那一行并不重要,这个文件中的各路径排列是按照英文字母顺序,您也不比独具匠心,按照这个顺序把您的MyApp目录的路径加进去吧!
step 4:
下一步是修改uClinux 2.4.x系统中对编译器来讲最重要的2个文件:
../Config/config.in (1)
../Config/Configure.help (2)
../Config/autoconf.h (3) {[<(这个文件不能手工修改,系统会自动修改它)>]}
step 5:
open 'config.in' file,首先把下面的内容拷贝:
#############################################################################
mainmenu_option next_comment
comment 'My New Application'
bool 'demo' CONFIG_USER_MYAPP_DEMO
bool 'app1' CONFIG_USER_MYAPP_APP1
bool 'app2' CONFIG_USER_MYAPP_APP2
bool 'app3' CONFIG_USER_MYAPP_APP3
comment "My New Application"
endmenu
#############################################################################
step 6:
make xconfig, 看到下面的画面!您的工作非常成功!
(sorry! i don't send .jpg files to website)
step 7:
相信下面的几步大家都很熟悉:
make dep
make clean
make lib_only(可以仅1次,不必要每次都来)
make user_only(每次修改过您的应用程序之后,这一步后面的都必须重来)
make romfs
make image
make
step 8:
download image.rom to your board! run it!
-
 热敏电阻温度阻值查询程序2024年11月13日 74
 -
C99语法规则2024年11月16日 675
-
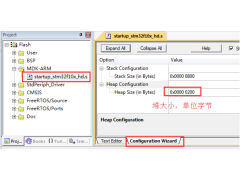 FreeRTOS 动态内存管理2024年11月12日 448
 -
一款常用buffer程序2024年11月06日 88
-
 1602液晶显示模块的应用2012年08月03日 192
 -
GNU C 9条扩展语法2024年11月18日 261
-
 如何实现STM32F407单片机的ADC转换2024年11月15日 300
 -
 STM32使用中断屏蔽寄存器BASEPRI保护临界段2024年11月15日 195
-
C99语法规则2024年11月16日 675
-
 51单片机LED16*16点阵滚动显示2012年09月05日 664
 -
FreeRTOS 动态内存管理2024年11月12日 448
-
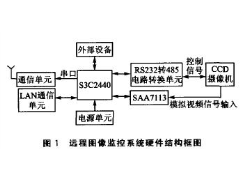 ARM9远程图像无线监控系统2012年07月03日 424
 -
 用单片机模拟2272软件解码2012年09月06日 300
 -
如何实现STM32F407单片机的ADC转换2024年11月15日 300
-
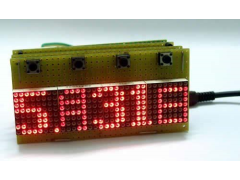 新颖的单片机LED钟2012年08月06日 278
 -
GNU C 9条扩展语法2024年11月18日 261